
How to Make Beer Bratwurst from Scratch
Learn how to make your own Beer Bratwurst from scratch! You will be amazed with the delicious Bavarian flavors in these juicy sausages.
Try making bratwurst from scratch! You’ll love the authentic flavors, the fresh ingredients, and the lack of preservatives. It’s easy with this step-by-step photo tutorial on how to make your own Beer Bratwurst.

It used to be that autumnal preparations for the home cook involved more than jamming, canning and drying the summer garden’s bounty. One of the lost rituals of preparing for the long winter ahead is the butchering of pork, beef, or game, and preserving the meat. While many home cooks still enjoy putting up for the winter, the convenience of supermarkets and the modern butcher make access to fresh meat simple.
But if you think back to a time when groceries and even refrigerators did not exist, families relied on preparing their meats to last through the winter, using methods such as salting, smoking, or if possible, freezing. Not a bit of the animal was wasted.
I recently re-read my battered copy of Little House in the Big Woods with my seven year old daughter, and to this day, one of my favorite chapters in this childhood classic is the one where they butcher the hog. To have a pig was considered a blessing, and I was always so intrigued by the incredible amount of work that needed to be done at butchering time. The idea of making sausage was exceptionally fascinating.
Making sausage at home is as archaic today as churning your own butter, but I learned that it is not as intimidating as it sounds. Not only is it fairly easy, it is very gratifying to know and be able to control the freshness of the ingredients, and enjoy eating sausage that is better for you, without any preservatives.
I hope you give this step-by-step photo tutorial of how to make your own Beer Bratwurst a try. It is, after all, Oktoberfest season!
Oktoberfest is traditionally celebrated in Germany from late September to the first weekend in October, however, in the U.S., many celebrations can be found through the month of October. So if you missed Oktoberfest in Munich this year, fear not. Pull on those lederhosen, pour yourself some beer, and try making your own Beer Bratwurst. It will have you singing and swaying to your favorite Oktoberfest tunes in no time!
Are you ready? Let’s get started:
How to Make Beer Bratwurst
The first thing you’ll need to do is see this guy.

Meet Dan. He’s one of the excellent butchers at my favorite market. I encourage you to get to know your butcher–they are an endless source of information, most important of which is what is most fresh. When selecting your meat, don’t hesitate to tell them what you are making; a good butcher is always happy to guide you with recommendations on cuts, sources, and alternatives. It turns out that Dan is an experienced sausage maker, so I was excited to pick his brain on this project.

We’re going for a fairly traditional German Bratwurst, so you are going to need a blend of pork and veal, as well as some casings. It’s always a good idea to check with the butcher in advance of your sausage making to make sure they have everything you need.

See the beautiful marbling of fat in the pork shoulder/butt? Having some fat is critical to a moist sausage, but as long as you have a very good cut of pork shoulder, there is no need to add fat as some sausage makers do. The leaner veal will balance it out.
Slice and Grind the Meat
Throughout the sausage making process, it is imperative to work with cold meat. I cannot stress this enough. Freeze the meat for about an hour prior to working with it, and always keep it well chilled throughout the process.
There are two reasons: (1) Like butter, it is easier to cut through any fats when it is chilled and it will incorporate better during the grinding, (2) Since the meat is is being handled outside of a chilled environment, we need to keep it cold for food safety reasons. For the latter reason, it makes sense that this is an autumn activity, when temperatures are cooler.

Slice the meat into smaller portions so that it can fit in your grinder. Always return to the refrigerator or freezer until you are ready to grind.

Your food or meat grinder most likely came with two grinding plates. You will grind the meat twice, the first time with the coarse grind. Keep an eye out for any clogging from fat. Again, using well chilled meat will help avoid this. Return the meat to the freezer for another 30 minutes.

Season the Meat
It’s time to season the meat. According to my butcher, dry ingredients are preferable because there is less chance of tearing the casing from chunks of fresh garlic, etc. However, with herbs, you can certainly opt for fresh. With this sausage, I used fresh Italian flat leaf parsley, taking care to remove all stems. Use a mixer or your hands to incorporate the seasoning into the meat.

Pass the meat through the grinder once more, this time using the fine grinding plate.

Before you move on, take a moment to check your seasoning. Take a small piece of the meat mixture, form it into a patty and fry it. Keep in mind that flavors will develop over time, but this will give you a good idea of how your final sausage will taste. Now is the time to adjust the seasoning if necessary.

It’s time give the meat a little drink. Use an excellent quality wheat beer; I deferred the selection to my husband, who is certainly more of the beer aficionado in the household. He chose the Portland-brewed Widmer Hefeweizen, a gorgeously amber, unfiltered wheat beer.
This award winning beer adds a fabulous flavor to the sausage and calls to mind the famous beer brats of the Midwest. Cover the meat tightly and allow the flavors to marinate overnight in the refrigerator. Then go ahead and sip the rest of that beer – you deserve it after a good day’s work of sausage making.

Stuff the Bratwurst
Okay, now it’s Day Two. I recommend getting an extra pair of hands to help you, especially if this is the first time you are making sausage. A sausage stuffer kit makes the work easier, though it isn’t necessary. If you have a pastry bag with a very wide tip, that would work just as well.
Prepare the casing by soaking it in cold water for about 30 minutes. In choosing your casing, hog or sheep casing is readily available, but most recommend hog casing because it is more durable and you are less likely to experience ruptures or tearing.
Lubricate the tip of the sausage stuffer with a little olive oil and guide the rinsed casing, gathering it at the base of the attachment. And don’t forget to tie a knot at the end so you don’t lose any of your precious filling!

Start stuffing the meat mixture into the casing by guiding it through the attachment. Take your time to make sure the mixture is packed consistently. Knot the other end. Use a sterilized needle to release any air bubbles in the casing.

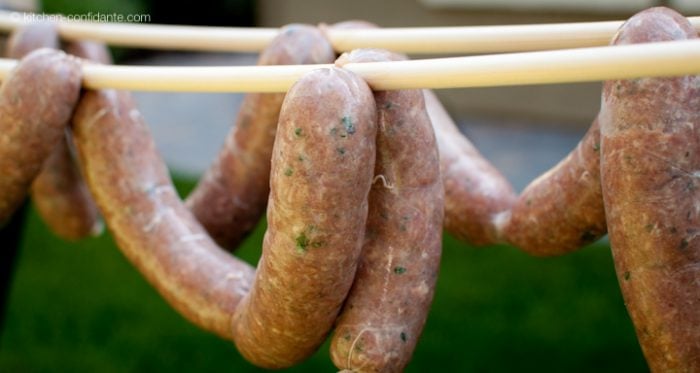
Create Sausage Links
Creating sausage links is very easy. Gather about 6-8 inches of sausage and twist at least three times to form a tight seal. Remember that the beer bratwurst may shrink during cooking, so check the buns you plan on using and size accordingly.
Dry the sausages on wooden dowels for about 30 minutes in a cool environment or until the casing is dry to the touch.
Refrigerate or freeze immediately until you are ready to use the sausages. The sausages may be kept for 1-2 days in the refrigerator.

Grill the Homemade Bratwurst
Time to grill! Pour yourself some Hefeweizen and get ready to watch your lovingly made creations sizzle on the hot grill. Remember to cook the meat thoroughly; it takes at least 20-30 minutes to cook the homemade bratwurst all the way through.

Go ahead and take a bite! You will be amazed with the authenticity of the delicious Bavarian flavors in this juicy made-from-scratch bratwurst! It will be hard to return to store-bought sausages again.

More Recipes to Try
How to Make a Charcuterie Board
Grilled Pork Skewers with Balsamic Marinade
Adobo-style Grilled Pork Tenderloin
Filipino-style Adobo Burgers
How to Microwave Corn on the Cob
Homemade Beer Bratwurst

Ingredients
- 1.5 lbs pork shoulder/butt
- 1.5 lbs veal leg
- 3 teaspoons Kosher salt
- 1 1/2 teaspoons onion powder
- 1 1/2 teaspoons ground white pepper
- 1 1/2 teaspoons marjoram
- 1 1/2 teaspoons garlic powder
- 1 teaspoon celery salt
- 1/4 teaspoon ground ginger
- 1 teaspoon allspice
- 1/4 teaspoon caraway seeds
- 3 tablespoons Italian flat leaf parsley leaves only, finely chopped
- 4 oz excellent quality wheat beer such as Widmer Hefeweizen
- about 1 yard of hog casing soaked and rinsed
Instructions
Grind & Mix the Meat
- Freeze meats (about one hour). Slice meat and grind with the coarse grinding plate. Return to freezer for another 30 minutes.
- Combine seasonings, with exception of the beer. Incorporate into the ground meat using a mixer or your hands.
- Grind the meat a second time, using the fine grinding plate.
- Check seasonings by taking a small piece of the meat mixture, forming it into a patty and frying it a pan. Adjust seasoning if necessary.
- Drizzle beer on the sausage mixture, tossing with hands. Cover tightly and refrigerate overnight.
Stuff the Sausage
- Soak the casing in cold water for 30 minutes and rinse.
- Lubricate the tip of the sausage stuffer with a little olive oil and start stuffing the meat mixture into the casing by guiding it through the attachment. Don’t forget to tie a knot at the end so you don’t lose any of your precious filling! If you don't have a sausage stuffing kit, a pastry bag with a very wide tip would work. Take your time to make sure the mixture is packed consistently. Knot the other end. Use a sterilized needle to release any air bubbles in the casing.
- Create sausage links by gathering about 6-8 inches of sausage and twist at least three times to form a tight seal. Remember that the bratwurst may shrink during cooking.
- Allow to dry on a rack in a cool environment for about 30 minutes or until casings are dry to the touch. Refrigerate or freeze until ready to use. The sausages may be kept for 1-2 days in the refrigerator.
Notes
Nutrition
Comments
COOKBOOK


Excellent post – you got my vote for this! Good luck :) Feel free to hop over to leave a comment :)
Have a wonderful day!
jen @ http://www.passion4food.ca
Liren, Another perfectly photographed, seasonally appropriate post!
This was amazing and of course you make it look easy! Can’t wait to see what the next challenge is……
This is such a great idea to do a picture post. Sausage making is a process that I am sure not too many are familiar with, but want to learn.
Wow – great post! You make this all look so easy (and delicious!) Good for you in taking on such an impressive challenge. Hope to join you in the next round :)
omg if i ate pork, i would be all over this business. That looks amazing! I love htat you can take something so traditionally processed and make it clean and simple.
Bravo!!
You definitely made the sausage-making process look so much easier than it is. Great post and love the pictures. You got my vote and good luck.
I sent a little red heart your way – Good luck! (Even though I don’t drink and don’t like Brats…) I did like the tutorial though. It was very thorough.
As a Wisconsin girl, you have won me over by mentioning “beer” and “brats” in one sentence. ;) I’m way impressed with stuffing your own.
ooo totally voting you on! I’ve made ground meat with my grinder but have yet to venture into sausage making!! Might need to give it a try :)
I’m a big fan of the “get to know your butcher” mantra! This is an AWESOME post. I’ve never thought to attempt to make my own sausages, but you make it look totally attainable. Good luck!! :)
Have just finished the nightly chapter of The Long Winter (we’re now on to the 6th book in Laura Ingalls-Wilder’s series) for my two girls. They love all the food descriptions too – the maple syrup, the salt pork, and the bit about eating the pig’s tail!
Great post, and enjoy a well-deserved rest until round 5.
Cheers, Fiona
you got me here!
I don’t believe you made beer bratwauts. That is crazy. You got my vote.
Yum – those look amazing, Liren! I’ve never tried making my own sausages before even though it’s one of my absolute favorite things to eat. Thanks to you, I’m not so intimidated by the process anymore. I also love your butcher, both the shop and the guy – looks like a cool place. Good luck this round!
absolutely beautiful….makes me want to make my own, which is saying a lot! Congrats! you have my vote.
You had me at your post title. And I’ve never seen a butcher’s shop look so, well, pretty. Or had such a yearning to buy a meat grinder. Great job! My vote’s in – good luck!
Another great post! I love how you walked us through each step, including the butcher’s, and illustrated the process so beautifully with your pictures. They look soo delicious!
Excellent, Liren–really nice job on this challenge.
Interesting, informative, and amazing photos. Best of luck!
Awesome entry! And OMG, I LOVE SAUSAGE!!! Wonderful photo tutorial. (VOTE!) Best wishes to you moving forward!
Another lovely post, Liren. I love the added portraits of the butcher and the butcher shop shots! You make sausages look so pretty!! Well done!!
oh my Liren! out of words on this one. you make your own bratwurst! always, you have my vote.
p.s. this is crazy. it’s over the top! congratulations!!
You make your own sausages??!!! OMG! I am simply blow away.. great job on the tutorial and as usual gonna vote :)
Impressive…Great entry and perfect step by step :)
Oh wow! Oh wow! I so want to do this. When I will have the time, I don’t have a clue, but I definitely want to do this. And it’s very much worth one of my PFB votes!
You have my vote for many reasons, but I must say, I’ve never seen better grill marks on a bun in my life! I wish we had a butcher like that near us.
-Gina-
I’ve always wanted to try making sausage, and thanks to your tutorial I think I might be a little less scared now! Great job on round for of the challenges…you’ve got my vote!
Wow, this is a great post! You definitely have my vote!!
Stunning, as always Liren. You always have my vote!
I am excited for your post, too, because, as luck would have it, I actually already have all of these kitchen aid attachments, that I have never used before (I inherited them all from my mother). but I think it is about time that I dusted them off and gave sausage making a try! Thanks for the inspiration, yours look absolutely perfect. =)
Good luck! Hope to see us both in round 5!!!
I have fond memories of sausage-making week in culinary school. Thanks for bringing them back! Your photos and sausage both look fantastic! I’m voting for you.
OMG, this has got to be my favourite tutorial so far! I’m so impressed at the gorgeous photos, especially since sausages aren’t exactly the most photogenic dish out there.
Plus, I’ve been dying to try making sausages at home for a while, and you make it look so easy that now I have absolutely no excuse… time to visit my butcher, obviously.